How to Bake Pumpkin Seeds

How to Roast Perfect Pumpkin Seeds

A Simple Fall Treat from Your Halloween Pumpkin

Roasted Pumpkin Seeds

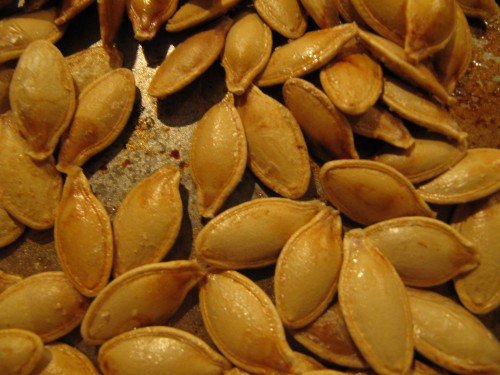
Mmm, I love pumpkin seeds! They look good, right?

Simple Roasting Instructions

1

Pre-heat your oven to 300 degrees Fahrenheit (ca. 149 degree Celsius).

2

Toss seeds in a bowl with one to two tablespoons of melted butter or olive oil.

  • You can use margarine instead of butter, or substitute another type of oil for the olive oil.
  • For a lower-fat version, skip the oil and butter and use cooking spray on your baking pan (I didn’t).
3

Place in a single layer in an oven-safe dish or on a baking sheet.

4

Sprinkle with salt.

5

Bake for 30–40 minutes, or until they start to brown, stirring every 10 minutes.

Try These Flavor Variations

Sweet & Spicy

Add 1 tablespoon brown sugar, 1/2 teaspoon cinnamon, and a pinch of cayenne before roasting.

Garlic Parmesan

Toss with garlic powder and grated parmesan cheese after roasting while still warm.

Ranch Style

Use a tablespoon of ranch seasoning mix with your oil before roasting.

Pro Tips for Perfect Seeds

  • Clean thoroughly: Rinse seeds well to remove all pumpkin pulp before roasting.
  • Dry completely: Pat seeds dry with paper towels or let them air dry for a few hours before coating with oil.
  • Season to taste: Salt is classic, but don’t be afraid to experiment with other seasonings!
  • Store properly: Once completely cool, store in an airtight container for up to 2 weeks.

Nutrition Benefits

Protein Great source
Magnesium Supports health
Fiber Aids digestion
Zinc Immune support

Your Thoughts?

What’s your favorite way to season pumpkin seeds? Do you have any special roasting techniques to share?

Marble Soda: A Delightful Japanese Beverage with a Surprising Design

Discovering the unique charm of Ramune, Japan’s iconic carbonated drink

I had marble soda for the first time last night and I loved it. So the gimmick is there is a marble inside the soda…get it…marble soda? The marble doesn’t actually come out of the bottle, but as you’re drinking it, you think you’ll swallow it. You can see the blue marble about 3/4 of the way up the bottle in the photo above. What I initially thought was just a novelty drink turned out to be a fascinating piece of beverage history with roots going back to the 19th century!

The Fascinating History of Marble Soda

What I’m drinking is actually a Japanese beverage called “Ramune” (pronounced rah-moo-neh), which has been popular in Japan for over a century. Despite its strong association with Japanese culture, Ramune has international origins. It was introduced in 1884 in Kobe, Japan by a Scottish pharmacist named Alexander Cameron Sim, who based it on lemonade. In fact, the name “Ramune” is derived from the Japanese pronunciation of the English word “lemonade.”

Surprisingly, Ramune was initially marketed as a medicinal drink to prevent cholera. The drink was originally called “mabu soda” (marble soda) in Japanese, referencing its distinctive bottle design. It soon became a hit after being advertised in the Tokyo Mainichi Newspaper, and has since become a beloved part of Japanese summer traditions, particularly during festivals.

Today, Ramune is available in dozens of flavors beyond the original lemon-lime, including strawberry, melon, orange, and some more unusual options like curry or wasabi. However, it’s the unique bottle that remains its most recognizable feature.

The Ingenious Codd-Neck Bottle

The distinctive bottle design wasn’t created in Japan – it’s actually called a “Codd-neck bottle,” invented by British engineer Hiram Codd in 1872. The design features a glass marble and a rubber washer that create an airtight seal to keep the carbonation fresh. Bottles are filled upside down during production, allowing the pressure of the carbonation to push the marble against the rubber washer, creating a perfect seal.

To open the bottle, you use a special plastic plunger (usually included with the drink) to push the marble down into the bottle. Once opened, the distinctive narrowing in the bottle neck prevents the marble from falling to the bottom or blocking the opening while you drink. The marble rattles around inside the bottle as you enjoy your drink, creating a fun, nostalgic experience.

While this type of bottle was once common worldwide for carbonated beverages, Ramune is one of the few drinks that still uses the Codd-neck design. It’s become such an iconic part of the Ramune experience that even Ramune-flavored candies sometimes come in packaging that mimics the marble design.

My Marble Soda Experience

Opening the bottle was half the fun. There’s something uniquely satisfying about pressing the marble down and hearing the “pop” as the carbonation is released. The flavor was refreshing and subtly sweet – the original Ramune flavor is often described as a light citrusy taste similar to lemon-lime soda, but with a distinctive candy-like quality that’s been compared to bubble gum.

The bottle in the photo appears to be the original flavor, which has a light blue hue to match its citrus profile. The text on the bottle is indeed in Japanese (not Chinese as I initially thought), and likely says “Ramune” along with the manufacturer’s branding.

I give marble soda a definite thumbs up! It’s not just the novel bottle design that makes it special, but also the refreshing taste and the cultural experience. Finding Ramune has become easier in recent years – while it was once available only at Asian specialty markets, today it can be found in many large grocery stores in the international section, or online retailers.

A Note on My New Camera

I got my new camera delivered today, and I’m really happy with it so far. I’ll blog more on that later, but this picture was taken with it and as you can see it is going to do a great job for me. The clarity of the image really captures the unique blue hue of the marble and the transparency of the bottle.

A Drink Worth Trying

If you’ve never tried Ramune, I highly recommend seeking it out for the unique experience. It’s more than just a drink – it’s a small piece of cultural history that has maintained its charm for over a century. There’s something wonderfully nostalgic about the sound of the marble rolling around inside the bottle as you enjoy the refreshing beverage.

Have you tried marble soda before? What was your experience like? Did you manage to figure out how to open it without making a mess? Let me know in the comments!

Join the Conversation

Have you tried unusual beverages from other countries? What’s the most interesting drink packaging you’ve encountered? Share your experiences in the comments below!

Organic Pop Tarts Recipe

Homemade Gourmet Pop-Tarts

A Sophisticated Take on the Breakfast of Champions

Blueberry Pop-Tarts Box

Gary sent me this recipe because he knows I love my breakfast of champions food…Pop-Tarts! OK I’ve been given a hard time for eating them so I have cut way back but man they are tasty.

This homemade version elevates the humble Pop-Tart to gourmet status with fresh ingredients and real fruit preserves. Perfect for a special breakfast or brunch!

Ingredients

For the Pastry:

  • 1 cup all purpose flour
  • 1/2 teaspoon kosher salt
  • 1/2 teaspoon sugar
  • 1/2 cup (1 stick) unsalted butter
  • 2 tablespoons cold water for mixing

For the Filling:

  • 1 cup homemade preserves/jam from organic fruit

For Finishing:

  • Powdered sugar

Note: Choose an organic store bought jam if you don’t have time to make your own.

Directions

1

Prepare the dough: Preheat the oven to 375 degrees. Place the flour in a bowl with the salt, sugar, and cut the butter into small pieces. Work the flour and butter together with your hands, until the mixture is well blended. Sprinkle the water over the mixture to smooth out the any small irregular clumps. Work the dough vigorously until it is relatively smooth. You may also use a food processor, if desired. Wrap in plastic and let the dough rest 30 minutes.

2

Shape the tarts: Roll out the tart dough on a cold lightly floured surface. The dough should be about 1/8″ inch thick. Cut rolled out dough into 3″ by 5″ shapes, using a postcard as a visual gauge. (For smaller tarts, simply use a smaller measurement.) Cut 8 rectangles, and use a pastry scraper to place 4 bottoms onto cookie sheet lined with parchment. Place 2 to 3 tablespoons of jam onto the center of each pastry of the 4 bottoms. Place the 4 pastry tops onto the jam centers, aligning the corners. Press the edges with a fork, until each tart is closed, working around the entire rectangle. (These may be prepared ahead of time and refrigerated or frozen.)

3

Bake and serve: Bake for 25 minutes, or until the tarts are golden brown. Serve immediately with a sprinkling of powdered sugar.

Recipe Tips

Jam Flavors

Try apple, apricot, cherry, wild blueberry, mango or your favorite fruit flavor for the filling.

Chilling is Key

Don’t skip resting the dough. This allows the gluten to relax and makes for a flakier pastry.

Make Ahead

Prepare the tarts ahead of time and keep refrigerated or frozen until you’re ready to bake.

Homemade vs. Store-Bought

Why Make Your Own?

  • Control over ingredients and sweetness
  • No artificial flavors or preservatives
  • Customizable to your favorite flavors
  • Impressive homemade treat for guests

When to Grab the Box

  • When you’re short on time
  • For that nostalgic, classic taste
  • When you need a quick breakfast
  • Sometimes nothing beats the original!

Your Thoughts?

What’s your favorite Pop-Tart flavor? Would you try making these homemade ones?